
There’s something undeniably magical about the simple act of breaking bread-an age-old ritual that brings people together, nourishes the body, and delights the senses. In “Breaking Bread: A Creative Guide to Perfect Homemade Loaves,” we invite you on a journey beyond the basics of baking, where flour and water transform into fragrant, golden masterpieces right in your own kitchen. Whether you’re a curious beginner or a seasoned baker seeking fresh inspiration, this guide blends time-honored techniques with inventive twists to help you craft loaves that are as gorgeous as they are delicious. Get ready to roll up your sleeves, embrace the rhythm of kneading, and discover the art and science behind creating perfect homemade bread, loaf after irresistible loaf.
Choosing the Right Flour for Flavor and texture
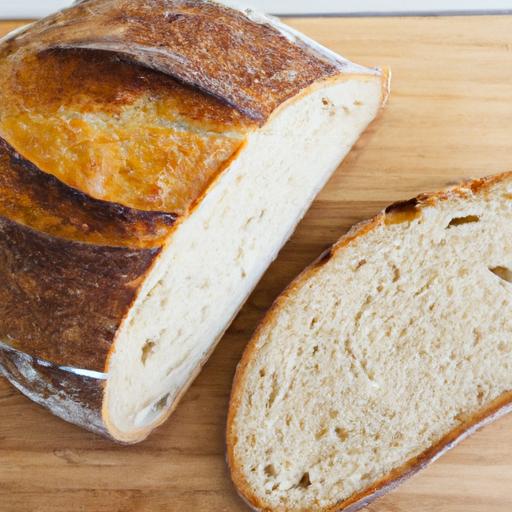
Breaking Bread at home transforms simple ingredients into a deeply satisfying experience. The journey to a perfect loaf begins with selecting the ideal flour, the foundation that dictates flavor, crumb, and crust. Opting for bread flour lends strength and chewiness thanks to its high protein content, ideal for those lofty, airy loaves. Simultaneously occurring,all-purpose flour offers versatility with a softer bite,perfect for tender sandwich breads. for a nutty complexity and rustic texture, incorporating whole wheat flour or rye flour adds character and depth, breathing historic grain traditions into each slice.
Experimenting with blends-like doughs made 70% bread flour and 30% whole wheat-balances elasticity with heartiness, crafting crumb textures that capture light and hold moisture beautifully. Keep in mind that hydration levels vary with different flours: whole grains absorb more water, which enhances flavor but requires a slightly altered technique. Knowing your flour creates a canvas to customize your loaf’s flavor profile and textural delight.
Prep and Cook Time
- Planning: 30 minutes (includes mixing and kneading)
- Fermentation: 2 to 4 hours (depending on proofing temperature)
- Baking: 30 to 40 minutes
- Total Time: Approximately 3 to 5 hours
Yield
One large artisan loaf (8-10 servings)
Difficulty Level
Medium – Perfect for bakers ready to explore hands-on techniques with rewarding results
Ingredients
- 3 ½ cups bread flour, sifted for lightness
- 1 cup whole wheat flour, finely ground
- 1 ½ cups lukewarm water (105°F / 40°C), adjust as needed
- 2 tsp active dry yeast
- 2 tsp fine sea salt
- 1 tbsp honey or natural sweetener
- 2 tbsp olive oil (optional, for richer crumb)
Instructions
- Activate the yeast: In a bowl, combine lukewarm water, honey, and yeast. Let it sit for 5-7 minutes until bubbly and fragrant,signaling active yeast.
- Mix the dry ingredients: In a large mixing bowl, whisk together bread flour, whole wheat flour, and sea salt.
- Form the dough: Pour the yeast mixture and olive oil into the flour. Stir with a wooden spoon or spatula until a rough dough forms. If too dry, add water a tablespoon at a time.
- Knead for structure: Transfer dough to a lightly floured surface. Knead vigorously for 10-12 minutes, folding and pressing into an elastic, smooth ball. Kneading develops gluten, essential for that chew and open crumb.
- First rise – bulk fermentation: Place dough into a greased bowl, cover with a damp cloth, and let it ferment at room temperature (70°F/21°C) for 2 hours, or until doubled in size.
- Shape the loaf: Gently deflate dough and shape into a tight boule or batard. Use gentle pulls to create surface tension for an even crust.
- Second rise – proofing: Place shaped dough onto parchment-lined baking sheet or into a banneton. Cover and proof for 45 minutes to 1 hour until puffy but not overinflated.
- Preheat the oven: Position a baking stone or inverted sheet rack in the oven and preheat to 475°F (246°C). Place a shallow pan on the bottom rack for steaming.
- Score and steam: Using a sharp bread lame or serrated knife, score the dough’s surface with confident slashes. Quickly pour hot water into the pan to create steam-this sparks a superbly crisp crust.
- Bake: Slide loaf onto the hot stone or baking tray. Bake for 15 minutes, then reduce heat to 425°F (218°C) and bake for an additional 20-25 minutes until deep golden brown.
- Cool: Transfer bread to a rack and let cool at least 1 hour before slicing-this resting phase lets the crumb set and flavor deepen.
Tips for Success
- Flour hydration: Adjust water incrementally; whole wheat flour absorbs more liquid.
- Gluten development: Perfect your kneading rhythm-too little means dense loaf; too much risks breaking gluten strands.
- Fermentation time: Warmer environments shorten proofing-trust your dough’s puffiness, not just the clock.
- Make-ahead: Shape the dough,cover,refrigerate overnight for slow fermentation that develops layered flavors.
- Variations: incorporate seeds, herbs, or roasted garlic into the dough for savory flair.
Serving Suggestions
Present your freshly baked bread with a smear of cultured butter,a drizzle of rich extra virgin olive oil,or alongside an artisanal cheese platter. Garnish with fresh rosemary sprigs or a scatter of toasted seeds for a rustic visual and flavor boost. Pair with homemade soups or vibrant salads for a complete, comforting meal.

| Nutritional Info (per slice) | Calories | Protein | Carbs | Fat |
|---|---|---|---|---|
| Homemade artisan bread | 150 kcal | 5 g | 28 g | 1.5 g |
For a deeper dive into fermentation science, explore the King Arthur Baking’s sourdough guide. Also,check our related article on Artisan Bread Techniques for more inspiration.
Q&A
Q&A: Breaking Bread - A Creative Guide to Perfect Homemade Loaves
Q1: Why is making homemade bread such a rewarding experience?
A1: Baking bread at home is a sensory journey-there’s the tactile joy of kneading dough, the quiet anticipation as it rises, and the irresistible aroma that fills your kitchen. It transforms simple ingredients into a warm, crusty masterpiece that nourishes both body and soul. Plus, it connects us to centuries-old traditions, making every loaf a small piece of history.
Q2: What are the essential ingredients for baking a perfect loaf?
A2: At its heart, bread is wonderfully simple: flour, water, yeast, and salt. Each element plays a key role-the flour provides structure, water hydrates and activates the yeast, yeast brings life through fermentation, and salt sharpens flavor while strengthening gluten. Quality ingredients and balanced proportions are the cornerstone of success.
Q3: How does fermentation influence the flavor and texture of bread?
A3: Fermentation is the magical phase where yeast consumes sugars, releasing carbon dioxide and organic acids that develop aroma and complexity. A slower,longer ferment-often achieved by cold-proofing dough overnight-enhances flavor depth and creates an open,airy crumb. Think of it as the bread’s time to dream and grow.
Q4: What’s the secret to achieving a crisp, golden crust?
A4: Steam is your crust’s best friend. Introducing moisture in the oven keeps the dough surface supple during the initial bake, allowing it to expand fully. As the steam dissipates, the crust hardens into a satisfying crunch. Techniques include adding water to a hot tray or baking inside a Dutch oven for a steamy mini-sauna effect.
Q5: how can beginners overcome the fear of making bread?
A5: Start simple and embrace imperfection.Bread baking is as much art as science, so every loaf teaches you something. Use straightforward recipes, measure ingredients carefully, and give yourself permission to learn through trial. Remember, the best loaves come from patience, practise, and a bit of curiosity.
Q6: Are there creative twists to personalize homemade bread?
A6: Absolutely! Mix-ins like olives, herbs, nuts, or dried fruits add bursts of flavor and texture. Experiment with different flours-rye, spelt, or whole wheat-to change character and nutrition. Shape your dough into braids or rolls for visual flair. Baking bread is your canvas,and each loaf can tell its own tasty story.
Q7: How vital is kneading,and are there alternatives?
A7: Kneading develops gluten,giving bread its chew and structure.Traditional kneading uses hands to stretch and fold dough, but no-knead recipes rely on time rather, allowing gluten to form gradually during long fermentation. Both methods can yield stunning loaves-choose what fits your rhythm.
Q8: What’s the best way to store homemade bread to keep it fresh?
A8: Bread is happiest on the counter, wrapped in a cotton or linen tea towel to breathe without drying out-for a day or two. For longer storage, slicing and freezing bread in airtight bags preserves freshness; just toast slices straight from the freezer. Avoid refrigeration, which tends to stale bread faster.
Q9: can homemade bread be nutritious?
A9: Definitely! Using whole grain flours increases fiber, vitamins, and minerals. Fermentation helps break down phytates, improving nutrient absorption. Homemade bread also avoids preservatives and additives found in many store-bought versions, making it a wholesome choice you control from flour to finish.
Q10: What mindset should bakers bring to their bread-making adventures?
A10: Approach with patience, creativity, and joy. Each loaf is a process-sometimes unpredictable-but full of learning and satisfaction. Celebrate small victories, savor sensory experiences, and let your kitchen become an experimental lab where tradition meets your unique touch. Baking bread is not just making food; it’s crafting comfort.
Future Outlook
As the aroma of your freshly baked loaf fills the kitchen, you’ve not just crafted bread-you’ve created a moment, a ritual, a humble masterpiece born from flour, water, and patience. Breaking bread at home is more than nourishment; it’s an invitation to slow down, connect, and celebrate the simple alchemy of transforming basic ingredients into something exceptional. With the techniques and tips shared in this guide, may your oven become a sanctuary of warmth and creativity, where each loaf tells its own delicious story. So gather your ingredients, dust off your apron, and let the timeless art of homemade breadmaking fill your days with flavor and joy-one perfect crumb at a time.